Showing posts with label #papercrafttoy. Show all posts

Thursday, February 20, 2025

Parrot monitor sitter built papercraft


As you maybe remember, I have made a series of »monitor sitter« animal papercrafts that are basically papercrafts you can make to put on your flatscreens and have them there for decoration or moral support, if you will:

https://www.deviantart.com/antyyy/art/Parrot-monitor-sitter-papercraft-974857391

They fit on any flatscreen on your PC screen, laptop, kindle, tablet, smartphone and even on vases, boxes or jars with slimmer rims, so you can decorate whatever you want with them. But basically, I made them to fit my laptop, so I could wedge them on my own PC :3

And since I have finally had the time to assemble them, here are the preview pictures on how they look like built and some tips for anybody wanting to make them for yourself.

********************

ASSEMBLY TIPS:

Whatever animal you assemble from this series, they are basically made the same way: built from top to bottom.

Build the crest first (for the cockatiel version), build the beak separately, then the head, glue the pre-made beak inside the head, then the body, the 3D tail, and only after you have all of the body parts, take the inner clamp side, pre-bend it, put glue on the leftover flaps of the body, and slide & glue the clamp part inside the body and close it up that way. Lastly, you can glue on the 2D 2-sided wings and the 2D feet.

That’s how I made all of my crafts you see and this is probably the simplest way to get this done and assembled.

***

NOTE: The papercraft includes all 4 colors, the gray and light gray cockatiel and a green and blue budgie that you can choose or build all 4 of them.

*******************************************************

*** This is a premium papercraft that you need to purchase in order to receive the PDFs and blank, locked PDO file for assembly. – You can buy and download the template here:

ko-fi.com/s/b16f932023

You can view all of my available premium papercrafts that are for sale on my Ko-fi page:

ko-fi.com/antyyyspapercrafts ***

********************

I hope you like the cuties and you’ll give them a go as well.

Enjoy and happy crafting~

Friday, February 7, 2025

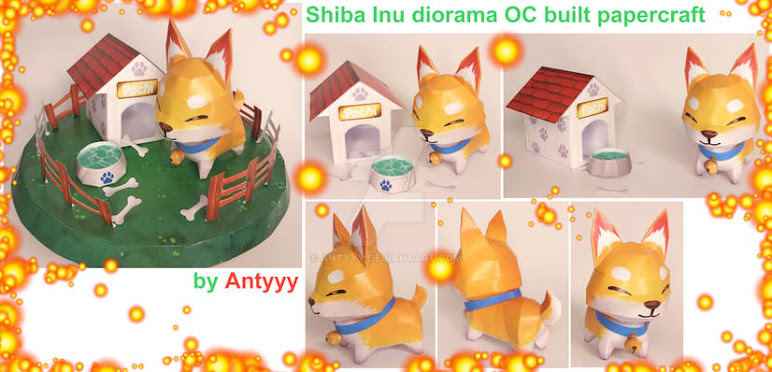
Shiba Inu diorama built papercraft


Already showed you my template of Pochi (:

https://www.deviantart.com/antyyy/art/Shiba-Inu-diorama-papercraft-1150294831

And now comes the assembly and tips for the built, so you can make one yourself.

*********************

The papercraft has many different optional parts, so you make the diorama, the dog house, the bowl, the dog itself and the 2D bones all separately.

For the stand itself, you build it top to bottom, like you would make a 3D box and you close it with the bottom part. Then you take the 4 parts for the fence and *pro-tip: glue them on each other (before cutting them out) by overlapping the parts (you can do this best if you turn them to a light source or place it near a window, so you can partially see-though the paper and know where to glue to together) and only when they are glued together, cut them out. I do this with all of my 2D 2-sided parts I make, since it’s the easiest and most precise way to do this. It’s really easy, so try it out. When you have the fence, knick and fold the bottom part of the fence a bit, so you can glue it on the flat surface of the stand and there you go.

For the bowl, it’s easiest by gluing the 2 sides of the bow together first, and BEFORE you close the bottom, you slide the water part inside the bowl, put glue on the flaps of the water part, and jam it upwards right to the point where the water stands and let dry. Only then, close the bowl and it’s done.

The dog house is also simple to make, a box-pattern craft you do and at the end close with the bottom part. And when the base house is done, glue on the flat root on it.

For the dog itself, best making it top to bottom, since I always pose the flaps that way with my papercrafts.

Start by making the 2 ears and glue together the whole head. Then start making the 4 paws separately, glue on the first few breast parts of the dog on the head, glue the front paws inside and make your way back to the back paws and glue those in. Now, make the 3D tail separately, and in the end, close the butt at the back and just slide the tail inside.

All you got to do is to cut out the 2D bell + collar to glue in around its neck and cut out the 2D bones, and the shiba inu diorama is done.

***************************************

*** This is a premium papercraft that you need to purchase in order to receive the PDFs and blank, locked PDO file for assembly. – You can buy and download the template here:

https://ko-fi.com/s/98a0fa5d93

You can view all of my available premium papercrafts that are for sale on my Ko-fi page:

ko-fi.com/antyyyspapercrafts ***

*********************

I hope you like this little Shiba cutie and you make your own version of it.

Enjoy and happy crafting~

Thursday, January 23, 2025

Shiba Inu diorama papercraft


A little silly diorama I wanted to make, seeing some very cute Shiba Inu dogs online.

At first, I only wanted to make the Shiba, but it kind of evolved into a diorama with all of the stuff around it and this is what came out. Sometimes art evolves itself through my hands, what can I say. And what we have is a typical anime Shiba Inu with a cute, round body, and I gave it a typical Japanese dog name “Pochi”, as you can see on the houses name tag :)

*********************

The papercraft is unfolded to a height of 10 cm and has 7 pages to print out with all of the items around. It consists of a simple, chibi 3D Shiba Inu dog with a 2D collar and a 3D bell, a simple 3D dog house, a 3D water bowl, 4 2D bones you can cut out, a 2D 2-sided fence and a 3D round stand with a grass pattern on it.

All in all, it’s a very simple craft to make, since I wanted to make a round and cute pudgy little pupper as a papercraft. The only smaller, fiddlier parts are the dog parts.

***************************************

*** This is a premium papercraft that you need to purchase in order to receive the PDFs and blank, locked PDO file for assembly. – You can buy and download the template here:

https://ko-fi.com/s/98a0fa5d93

You can view all of my available premium papercrafts that are for sale on my Ko-fi page:

ko-fi.com/antyyyspapercrafts ***

*********************

I hope you like this little Shiba cutie and you make your own version of it.

Enjoy and happy crafting~

Monday, December 9, 2024

Cat monitor sitter built papercraft


As you maybe remember, I have made a series of »monitor sitter« animal papercrafts that are basically papercrafts you can make to put on your flatscreens and have them there for decoration or moral support, if you will:

https://www.deviantart.com/antyyy/art/Cat-monitor-sitter-papercraft-954819755

They fit on any flatscreen on your PC screen, laptop, kindle, tablet, smartphone and even on vases, boxes or jars with slimmer rims, so you can decorate whatever you want with them. But basically, I made them to fit my laptop, so I could wedge them on my own PC :3

And since I have finally had the time to assemble them, here are the preview pictures on how they look like built and some tips for anybody wanting to make them for yourself.

********************

ASSEMBLY TIPS:

Whatever animal you assemble from this series, they are basically made the same way: built from top to bottom.

Build the ears first, then the head, attach the front paws, the body, the 3D tail, the back legs and only after you have all of the body parts, take the inner clamp side, pre-bend it, put glue on the leftover flaps of the body, and slide & glue the clamp part inside the body and close it up that way.

That’s how I made all of my crafts you see and this is probably the simplest way to get this done and assembled.

***

NOTE: The preview pictures made only include 2 of the 3 colors that are included in the pack. You have the brown, the white and the black colors that you can choose or build all 3 of them.

*******************************************************

*** This is a premium papercraft that you need to purchase in order to receive the PDFs and blank, locked PDO file for assembly. – You can buy and download the template here:

ko-fi.com/s/2b479dfce2

You can view all of my available premium papercrafts that are for sale on my Ko-fi page:

ko-fi.com/antyyyspapercrafts ***

********************

I hope you like the cuties and you’ll give them a go as well.

Enjoy and happy crafting~

Friday, November 22, 2024

Dog monitor sitter built papercraft


As you maybe remember, I have made a series of »monitor sitter« animal papercrafts that are basically papercrafts you can make to put on your flatscreens and have them there for decoration or moral support, if you will:

https://www.deviantart.com/antyyy/art/Dog-monitor-sitter-papercraft-960660974

They fit on any flatscreen on your PC screen, laptop, kindle, tablet, smartphone and even on vases, boxes or jars with slimmer rims, so you can decorate whatever you want with them. But basically, I made them to fit my laptop, so I could wedge them on my own PC :3

And since I have finally had the time to assemble them, here are the preview pictures on how they look like built and some tips for anybody wanting to make them for yourself.

********************

ASSEMBLY TIPS:

Whatever animal you assemble from this series, they are basically made the same way: built from top to bottom.

Build the ears first, then the head, attach the front paws, the body, the 3D tail, the back legs and only after you have all of the body parts, take the inner clamp side, pre-bend it, put glue on the leftover flaps of the body, and slide & glue the clamp part inside the body and close it up that way.

That’s how I made all of my crafts you see and this is probably the simplest way to get this done and assembled.

***

NOTE: The preview pictures made only include 2 of the 4 colors that are included in the pack. You have the light brown, the gray, the black and the red-brownish colors that you can choose or build all 4 of them.

*******************************************************

*** This is a premium papercraft that you need to purchase in order to receive the PDFs and blank, locked PDO file for assembly. – You can buy and download the template here:

ko-fi.com/s/39971a9ae4

You can view all of my available premium papercrafts that are for sale on my Ko-fi page:

ko-fi.com/antyyyspapercrafts ***

********************

I hope you like the cuties and you’ll give them a go as well.

Enjoy and happy crafting~

Monday, November 18, 2024

Bear monitor sitter built papercraft


As you maybe remember, I have made a series of »monitor sitter« animal papercrafts that are basically papercrafts you can make to put on your flatscreens and have them there for decoration or moral support, if you will:

https://www.deviantart.com/antyyy/art/Bear-monitor-sitter-papercraft-956843700

They fit on any flatscreen on your PC screen, laptop, kindle, tablet, smartphone and even on vases, boxes or jars with slimmer rims, so you can decorate whatever you want with them. But basically, I made them to fit my laptop, so I could wedge them on my own PC :3

And since I have finally had the time to assemble them, here are the preview pictures on how they look like built and some tips for anybody wanting to make them for yourself.

*******************

ASSEMBLY TIPS:

Whatever animal you assemble from this series, they are basically made the same way: built from top to bottom.

Build the ears first, then the head, attach the front paws, the body, the 3D tail, the back legs and only after you have all of the body parts, take the inner clamp side, pre-bend it, put glue on the leftover flaps of the body, and slide & glue the clamp part inside the body and close it up that way.

That’s how I made all of my crafts you see and this is probably the simplest way to get this done and assembled.

***

NOTE: The preview pictures made only include 2 of the 3 designs that are included in the pack. You have the panda, the polar bear and the brown bear design that you can choose or build all 3 of them.

*******************************************************

*** This is a premium papercraft that you need to purchase in order to receive the PDFs and blank, locked PDO file for assembly. – You can buy and download the template here:

ko-fi.com/s/d998f495c9

You can view all of my available premium papercrafts that are for sale on my Ko-fi page:

ko-fi.com/antyyyspapercrafts ***

********************

I hope you like the cuties and you’ll give them a go as well.

Enjoy and happy crafting~

Tuesday, April 30, 2024

Fruity bird toy built papercraft


Already showed you the template with all the color-combinations themselves (which you can see here):

https://www.deviantart.com/antyyy/art/Fruity-bird-toy-papercraft-1042730044

So now all that is left to do is to show you how this cutie looks and works as well :)

:bulletorange: :bulletorange: :bulletorange: :bulletorange: :bulletorange: :bulletorange: :bulletorange: :bulletorange: :bulletorange: 

ASSEMBLY TIPS:

The papercraft build for this can be divided into 4 separate parts: the bird itself, the lid, the inner side and the bottom with the handle.

The assembly it pretty straightforward from the PDO included already, but I do want to mention 2 tips.

1.       You have 2 middle parts with holes in the template and those 2 middle parts need to be glued together (with both holes cut out, so the bird can pop out of it).

2.       Also, for the bird to better pop out of the fruit, I definitely suggest you first assemble the bottom fruit part with the handle and BEFORE you glue on the handle on there, make sure to test out the ideal length of the handle and how much needs to stick out to make the movement smoother. It needs to be sticking out almost 3/5 out of the hole for it to be ideal to work. So, try out the length and after you find the sweet spot, glue on the handle on the “glue here” tab on the bottom part.

Really simple and super cute as well, don’t you think? Nothing really too fancy or complicated, since I wanted to design it to be easily assembled.

:bulletyellow: :bulletyellow: :bulletyellow: :bulletyellow: :bulletyellow: :bulletyellow: :bulletyellow: 

And as a special treat, since it IS a moving papercraft toy, I made a simple gif animation on how it looks when it pops out:

https://www.deviantart.com/stash/02710j1y34nb

:bulletred: :bulletred: :bulletred: :bulletred: :bulletred: :bulletred: :bulletred: :bulletred: :bulletred: :bulletred: :bulletred: :bulletred: :bulletred: :bulletred: :bulletred: 

*** This is a premium papercraft that you need to purchase in order to receive the PDFs and blank, locked PDO file for assembly. – You can buy and download the template here:

https://ko-fi.com/s/b193da546c

You can view all of my available premium papercrafts that are for sale on my Ko-fi page:
https://ko-fi.com/antyyyspapercrafts ***

:bulletorange: :bulletorange: :bulletorange: 

Do enjoy the cutie and happy crafting~

Tuesday, April 16, 2024

Fruity bird toy papercraft


Based on the adorable cat box papercraft, I decided to make a bird version out of it. Why? Coz birds are THE most adorable creatures ever of course XD I based them off some super cute gacha figures I got from Japan (see in the pic) and decided to do a fruit bird spin-off as you can see.
 
:bulletyellow: :bulletyellow: :bulletyellow: :bulletyellow: :bulletyellow: 

The papercraft is unfolded to 19 cm, so that would be about 10 cm height for the fruit bird box overall. I has 6 pages to print, since I also included a box crate for the fruit transportation as a cute add-on.

The papercraft toy consist of a simple design of a bird that pops out of the fruit when you push the handle in front of it. In includes 7 different color-combinations of the bird and the fruit it is in, so you can combine any color you want with it. The download also includes not only the PDF and PDO file for easier assembly (as do all of my papercrafts I sell), but also an assembly help picture where you have the instructions written down as well. It’s super simple to make and has maximum cuteness :) that’s what I wanted to make with this, basically.

:bulletred: :bulletred: :bulletred: :bulletred: :bulletred: :bulletred: 

*** This is a premium papercraft that you need to purchase in order to receive the PDFs and blank, locked PDO file for assembly. – You can buy and download the template here:

https://ko-fi.com/s/b193da546c

 You can view all of my available premium papercrafts that are for sale on my Ko-fi page:
https://ko-fi.com/antyyyspapercrafts ***

:bulletorange: :bulletorange: :bulletorange: 

Hopefully I’ll get some time to assemble this aka make a preview build for all of you as well. I really want to see it in action myself.

Do enjoy and happy crafting~