Friday, August 9, 2019

Scorbunny (Pokemon Sword/Shield) built papercraft


Last of the new Galar starters is my favourite so far (got to see the 1. and 2. evolution to be sure, because with the probable fighting type as secondary, I can guarantee it will probably suck for my reasoning of good taste XD just to make it clear here) is the fire starter Scorbunny!

Scorbunny Emoticon 

The craft is about 24 cm tall. As always with my personal builts, I started from top till bottom. So first I made his cute ears XD I mean they are super cute, let's be honest here, and continued with the stripes of the head. At about half of the head I built the sepparate 4 cheeks or whiskers, so to speak, and attached them on his face and built the remaining head part. Then I built the 2 arms and attached them to the upper part of the body. After I had the upper body with the arms glued on, I glued it to the built head.

***I find it to be simpler this way than just to built it stripe by stripe, because you have a lager piece that I find easier to glue on. Especially since at the point where you have to built the body, you have to built it on the head, meaning turning it upside down, so the more of the body you built, the easier it will be at the end to make it, without having to attach everything on the head itself XD I hope you get my point, that's how I find it way easier to make papercrafts, as a special tip for anybody building them and still figuring out how to make it simpler.*** 

Anyway, as I had the head and half of the body attached to one another, I made the cute little bunny tail and attached it and build the remaining bottom half of the body and the legs stripe by stripe on it, making sure to reinforce the legs with additonal paper rolls, just to be sure it will stand, which you can see it does, and sealing the whole craft with the remaining bottom parts of the legs or its footprints. 

Appart from the fiddly legs at the end, nothing is exceptionally hard to built, so it's way easier to do, than for example Sobble, which has way more fiddly legs AND hands :D 


For anybody wanting more info about the template, you can find those here: 

Hope you liked some of my Galar Pokemon and I'll be sure to make some more ;)


***This is a premium papercraft that you need to purchase in order to receive the PDF and blank PDO files for assembly. – You can find all information about the PayPal purchase in the provided upper outgoing link.***

Thursday, August 8, 2019

Morpeko (Pokemon Sword/Shield) papercraft


Saw the new trailer yesterday, and of course as always, I wanted to be the first one to make the new Pokemon papercraft of the cutest little bugger, Morpeko! :D

Morpeko Emoticon 

This Pokemon is so like me, like I am a real monster when hugry. Not to mention the whole cake thing with Alcremie, the new Pokemon sleep feature, etc etc, I really think the Japanese are trying to tell me something :D Just saying the obvious...

Moving on to the craft, it is 20 cm tall and as you can see consists of the 2 modes of Morpeko, full belly mode and hangry mode. I was thinking of making 1 and just interchangable texture, but I though that they should be at eachothers side so you can see both like this, since it is one side of the same coin, so to speak. The craft itself is pretty straightforward, it consists of 2 differenty textured 3D models, which is attached to all the parts. The hands are a bit fiddly, since it has a small thumbs, everything else should be easy to do. 

***This is a premium papercraft that you need to purchase in order to receive the PDF and blank PDO files for assembly. – You can find all information about the PayPal purchase in the provided upper outgoing link.***


Hope you like it and happy crafting~


UPDATE:  

For those who are interested how the papercraft looks built, here is the papercraft I built myself:

https://www.deviantart.com/antyyy/art/Morpeko-Pokemon-Sword-Shield-built-papercraft-814690058

Sobble (Pokemon Sword/Shield) built papercraft


Next in line is my Sobble papercraft XD just look at those cute cheeks awwwww :)

Sobble Happy Emoticon 

The papercraft is around 23 cm tall. As always, I started with the head, making his little headpiece and then continuing down to his neck. After that, next in line were the arms and legs. THE MOST tidious hands and legs I have done in a long time, damn those little limbs, I hate doing these so much!!! so those were quite a workload to do, but in the end they were worth is because it looks so cute with those :D I mean just look at it XD

After the legs and arms were done, I attached the arms on the neck piece and glued it to the head. I next made the tail and glued that one with the legs and added them on the body. Last was a closing piece at the bottom and voilà, here it is .D 

The template has a sepparate tail holder at the back if you should have problems for it to stand, but it stands well on it's own so I didn't use that. 

***Note that I made it 2 little tears for his eyes at the end, just because I wanted to have a little fun with it and it's name is "SOBB"le, so... Anyway, the tears are just cut out of cardbaord so they are not included in the template, just a bit of an extra since I was feeling it should be there XD ***

For those who are interested about some info regarding the template, you can find those here:


***This is a premium papercraft that you need to purchase in order to receive the PDF and blank PDO files for assembly. – You can find all information about the PayPal purchase in the provided upper outgoing link.***

Wednesday, August 7, 2019

Grookey (Pokemon Sword/Shield) built papercraft


Tadaa! A new built Pokemon designed and built by me :) This time I wanted to share with you Grookey ;)
Grookey Happy Emoticon

The papercraft is about 21 cm tall and has some nasty fingers to build, since I hate doing those so much XD BUT Grookey has paws with 5 fingers, so if you want it to be accurate, that's the way to go XD 

I started by doing the snout, ears and the sepparate 3D stick. After those were finished, I glued together the top leafs on his head and continued to make the whole head with the snout and ears. After I finished the whole head, I decided to make the tail and the back legs. I glued together the tail and the legs with the remaining stripes for the back of the body and glued those on the head. Now the only part that was left were the front legs. I made those on the body, making sure to seal all the holes and at the end I added the bottom footprints to seal the whole thing up. I found this way to be easiest for me to make, but feel free to make it as you wish. 

For anybody interested on more info about the template, you can view it here: 


***This is a premium papercraft that you need to purchase in order to receive the PDF and blank PDO files for assembly. – You can find all information about the PayPal purchase in the provided upper outgoing link.***

Hope you like it, more of these built crafts to come soon ;)

****Btw!!!
I know the colors of these built crafts are off with the templates I made, that's because I have no printer myself and my low-budget-ass needed to print these for free on a shitty printer, so the colors are not really representing what's in the PDO files. Sorry for that! It all depends on how high quality your computer and printer are to get the right color out of it! So don't make the same mistakes as me XD ****

Tuesday, August 6, 2019

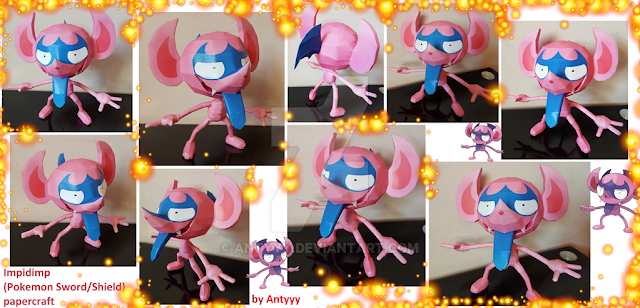
Impidimp (Pokemon Sword/Shield) built papercraft


Next built Pokemon in line I wanted to build for you is Impidimp. Not a confirmed confirmed Pokemon shown in the trailers, but he is a playable character in the Pokemon Sword/Shield demos currently going around all the gaming conventions around the world, so I would say it is still pretty much 100% confirmed ;) I saw the community getting into fights because of the new games and what it is missing and what not, but I really just wanted to get everybody on board to remember the good things we all love about the games and making the new Pokemon designs touchable and near to everybody. 

Moving on to the papercraft itself, it is about 20 cm tall. I first built the tongue with the inner mouth really, then moved on to the ears and added those built pieces on the face as I went along from top till bottom. As I built the whole head, I glued the sepparate 3D teeth and glued them in the mouth corners. Since it has a rather small neck and body, I made sure to reinforce the neck part with a roll of paper I added on the neck till the top of the head, so I was absolutey sure the neck would not snap, since you have to do the remaining body on the head itself and it holds on like it should :) So I definetly recomend to reinforce the neck-part with something additional, whatever you are used to really. 

Next came the arms with the 3 fingers on each side, which I build to the shoulders first and glued those on the neck part and then on the head. After that I just built the rest of the body with the legs piece by piece on the glued together parts, turning his head around and gluing the remaining strips on like that, since it was the easiest for me to do, since I always make the crafts from top till bottom.

Definelty not hard to do but a bit fiddly with the large head and the fingers, so I would say maybe a 7/10. And as you can see in the pictures, it definetly stands on it's own without me adding any kind of weights in the legs. But if you wish to be sure, add any weights in the legs as well :)

For anybody who is interested on more info about the template they can be found here: 


Hope you like it and happy crafting everybody~


***This is a premium papercraft that you need to purchase in order to receive the PDF and blank PDO files for assembly. – You can find all information about the PayPal purchase in the provided upper outgoing link.***